DVB102 Image Design and Production
Week 1 Images (1-5)
#oneperday2023
Image 1: Make Your Mark Exercise
In this exercise a variety of different equipment was manipulated to mark paper, allowing students to test and observe the quality of their marks, while developing an understanding of necessary design skills and techniques.
Materials
A4 Paper, Pencil, Watercolour Pencil, Fine Line Pen, Graphic Marker, Watercolour Paint, Acrylic Paint, fine tip brush
Techniques
Drawing, Shading, Hatching, Painting
Process
A Pencil was manipulated to draw a 6 x 9 grid on A4 paper. The first tool (Pencil) was then used to mark the paper in a variety of different patterns to observe the materials properties and how it interacted with the paper. Shading was the first technique applied, followed by dotting, scoring, hatching, and finally drawing. This process was then repeated with the remaining 2 dry marking tools, followed by the 3 wet marking tools (See Figure 1 below).

Figure 1: Make your mark results
Reflection
During application, it was concluded that the dry marking tools were easy to control and manipulate and it was observed that they produced a finer mark. It was concluded that wet marking tools were much harder to control when applied by a brush and it was observed that the ink spread and bled, producing a different mark entirely.
Strength
Manipulating dry marking tools and creating fine, uniform shapes and images.
Challenge
Controlling wet marking tools (specifically those applied with a brush) and utilising the properties of the ink.
Images 2 - 4: Observation Exercises 1 - 3
This exercise manipulates the skills and techniques developed in the previous exercise to create visualisations of objects in the real world using students observational drawing abilities.
Materials
A4 Paper, Pencil, Fine Line Pen, Watercolour Paint, fine tip brush, thick tip brush
Techniques
Drawing, Shading, Painting
Process
First, 4 everyday items with varying shapes and sizes were selected to recreate (See Figure 2 below). After selecting these items, a pencil was used to mark their outlines and contours and emboldened with a fine line pen (See Figure 3). On a different sheet of paper, the item's silhouettes were recreated using a thick and thin brush, as well as watercolours (See Figure 4). Finally, the outline of the objects was drawn using a fine line pen to create a more professional drawing and improve the pieces depth (See Figure 5).
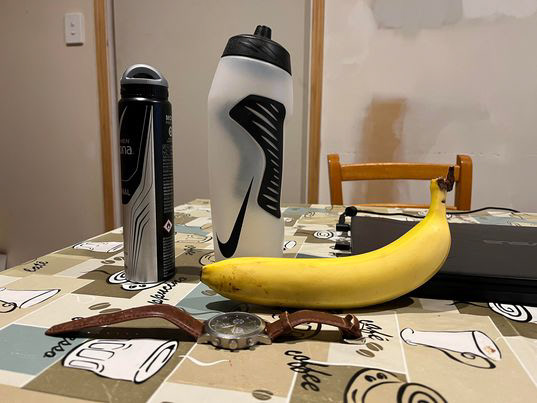
Figure 2: Observation Exercise Items

Figure 3: Observation Exercise 1 (everyday items with fine line pen)
Reflection
After the first exercise I felt confident in my ability to sketch and create with a fine line pen. The images produced resemble their real world counterparts, incorporate their significant details and are proportionate. By using the contours of the items, I have been able to create realistic diagrams of the items selected and I am happy with the images produced.
Strength
Manipulating dry marking tools, creating contours and edge lines to produce accurate diagrams with a fine line pen.
Challenge
Creating natural contours and edge lines to follow when drawing the diagram for the leather band of the watch and the banana.

Figure 4: Observation Exercise 2 (silhouettes with watercolours)
Reflection
I was not very confident using watercolours initially. However, after experimenting with blending different colours and working with wet and dry marking techniques, I was able to create images that resembled their objects. The silhouettes produced are accurate and by blending the different colours manipulated with respect to the object's contours, I was able to create a natural depth and shadow for each object.
Strength
I am especially proud of the deodorant can and watch silhouette. By using a both wet and dry techniques and layering paint I was able to produce images that were extremely accurate, despite these objects complexity.
Challenge
Manipulating watercolours and wet techniques was extremely difficult. Next time I would like to focus more on using wet techniques to create depth as this was key to creating realistic images.
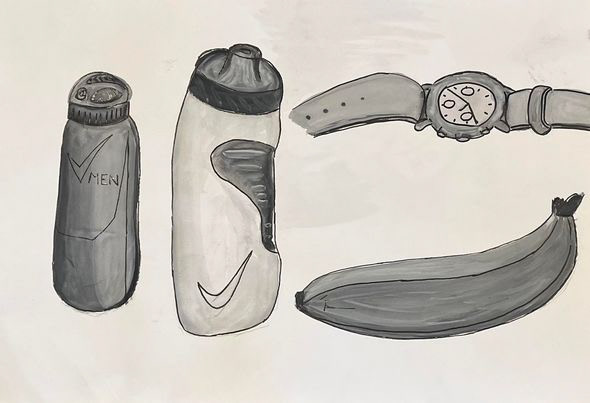
Figure 5: Observation Exercise 3 (watercolour silhouettes with fine line details)
Reflection
This process was both enjoyable and tedious. Creating the outline for the objects using a fine line pen added realism to the images and resulted in a more professional looking piece. It was fulfilling observing these images come to life while using a variety of materials and techniques. However, during sketching the fine line pen did not interact well with the watercolours as it blocked the ink from marking the paper. Lines had to be drawn and redrawn to create noticeable markings which was frustrating. Ultimately, these images are detailed copies of the objects photographed and are both proportionate and realistic.
Strength
Controlling the fine line pen to draw straight markings that aligned with the contours of the objects.
Challenge
Marking the images with the fine line pen through the layers of watercolour paint.
Images 5: Observation Exercises 4
Negative space regards parts of a composition that surround an image or subject and can be used to enhance a piece and provide audiences with additional information in a subtractive manner. This exercise allowed students to practice the skills developed in the previous exercises, while experimenting with the application of negative space.
Materials
A4 Paper, Pencil, Water Colour Paint, thick tip brush
Techniques
Drawing, Shading, Painting
Process
An image with a clear and obvious subject was first selected. After careful consideration, I chose an online image of a landscape (Alcatraz Island) I had visited on a holiday when I was younger (See Figure 6 below). After, various watercolours were manipulated to resemble the ocean and sky in the image and create a background for the subjects (See Figure 7). With the subjects outlined in the negative space, a pencil was then used to highlight and shade the subjects and their features (See Figure 8).

Figure 6: Observation Exercise Online Image

Figure 7: Observation Exercise 4 Background (Ocean and Sky with watercolours)
Reflection
After familiarising myself with watercolours and wet application techniques I was confident creating the background for my image. A horizon line for the subject was established using the negative space and different shades of blue. The varying colours ultimately enhanced the final image, creating a diverse background with an obvious ocean and sky, with the silhouette's of a person and an island in the negative space.
Strength
After practicing wet application techniques for watercolours I was rather confident applying the markings to create this image.
Challenge
This had been my first time creating an image that depended on negative space and as a result the silhouette's turned out rigid. This will be something to consider the next time I approach utilising negative space in this manner.

Figure 8: Observation Exercise 4 (Negative Space)
Reflection
With their Silhouette's outlined, creating the subjects using pencil was enjoyable. I was able to create a figure with long hair in a jacket and a landscape in the distance using sketching and shading techniques. I believe the figure could have been improved. However, the landscape possesses significant detail with numerous 3 dimensional buildings and land masses with varying texture at different altitudes. I enjoyed sketching finer details with pencil, emboldening individual lines to create depth and adjusting shading styles to give a different feel for parts of the landscape. I am rather happy with how this exercise turned out and I am excited to continue experimenting with negative space.
Strength
Using pencil to sketch different shapes, shade in different styles to change the subjects texture and embolden lines to create depth.
Challenge
Painting around the subjects to establish negative space. With no outline, creating the silhouette's of both subjects was challenging.
Weekly Reflection
From these images I have become more familiar creating with pencils, fine line pens and watercolours and now understand their properties and how they interact with the paper. These exercises have enabled me to create both thick and thin lines to resemble different objects and have shown me that adjusting the pressure in which the marking tool is applied can create different colours and shapes. As I create more images it becomes apparent I am more familiar with the marking tools and am able to create smoother contours and subject outlines with greater depth.
